I hated writing code in University.
Background
It was something about how long it took. The unnatural shapes my fingers made to find keys I seldom used. I still have to look to find the square brackets sometimes.
During my second year, we were in lockdown, and I had hours to spend at my machine. Turns out, having lots of time to think makes it easy to find problems. Tumbling down yet another warren, I finally found a rabbit. That rabbit was my 60wpm typing speed I earned from a decade of growing up, picking at my keyboard with my first 2 fingers.
When comparing that figure with the 180wpm we supposedly talk at, that seemed to satisfy me, and explained why writing code irritated me so much. My fingers are clumsy. Pondering, the next tunnel came into view, and with it the question:
What is touch typing?
Keybr - Getting Started
It’s a very old style of typing, back in the typewriter days. The idea is simple enough; Your fingers sit on the 2 bumps on the [F] and [J] keys. Actually feel for them now (if you’re not on mobile) and find them without looking. That’s the home row. Keep the index fingers on those keys, let the rest of the hand sit on the keyboard and that’s where we start.
If you google how to learn touch typing, you’ll find plenty of websites ready to sell you a subscription to learn. But if you don’t want to practice pressing [F] 20 times to confirm you know where the left bump is, or that you have lots of respect, you’ll need to find another solution.
FOSS to the rescue!!!
So there’s this project called Keybr.com that’s both available on Github that lets you learn touch typing in way that’s actually intuitive and teaches! It’s pretty amazing. Turns out it was also hard to find when you don’t know it exists.
So how does it work?
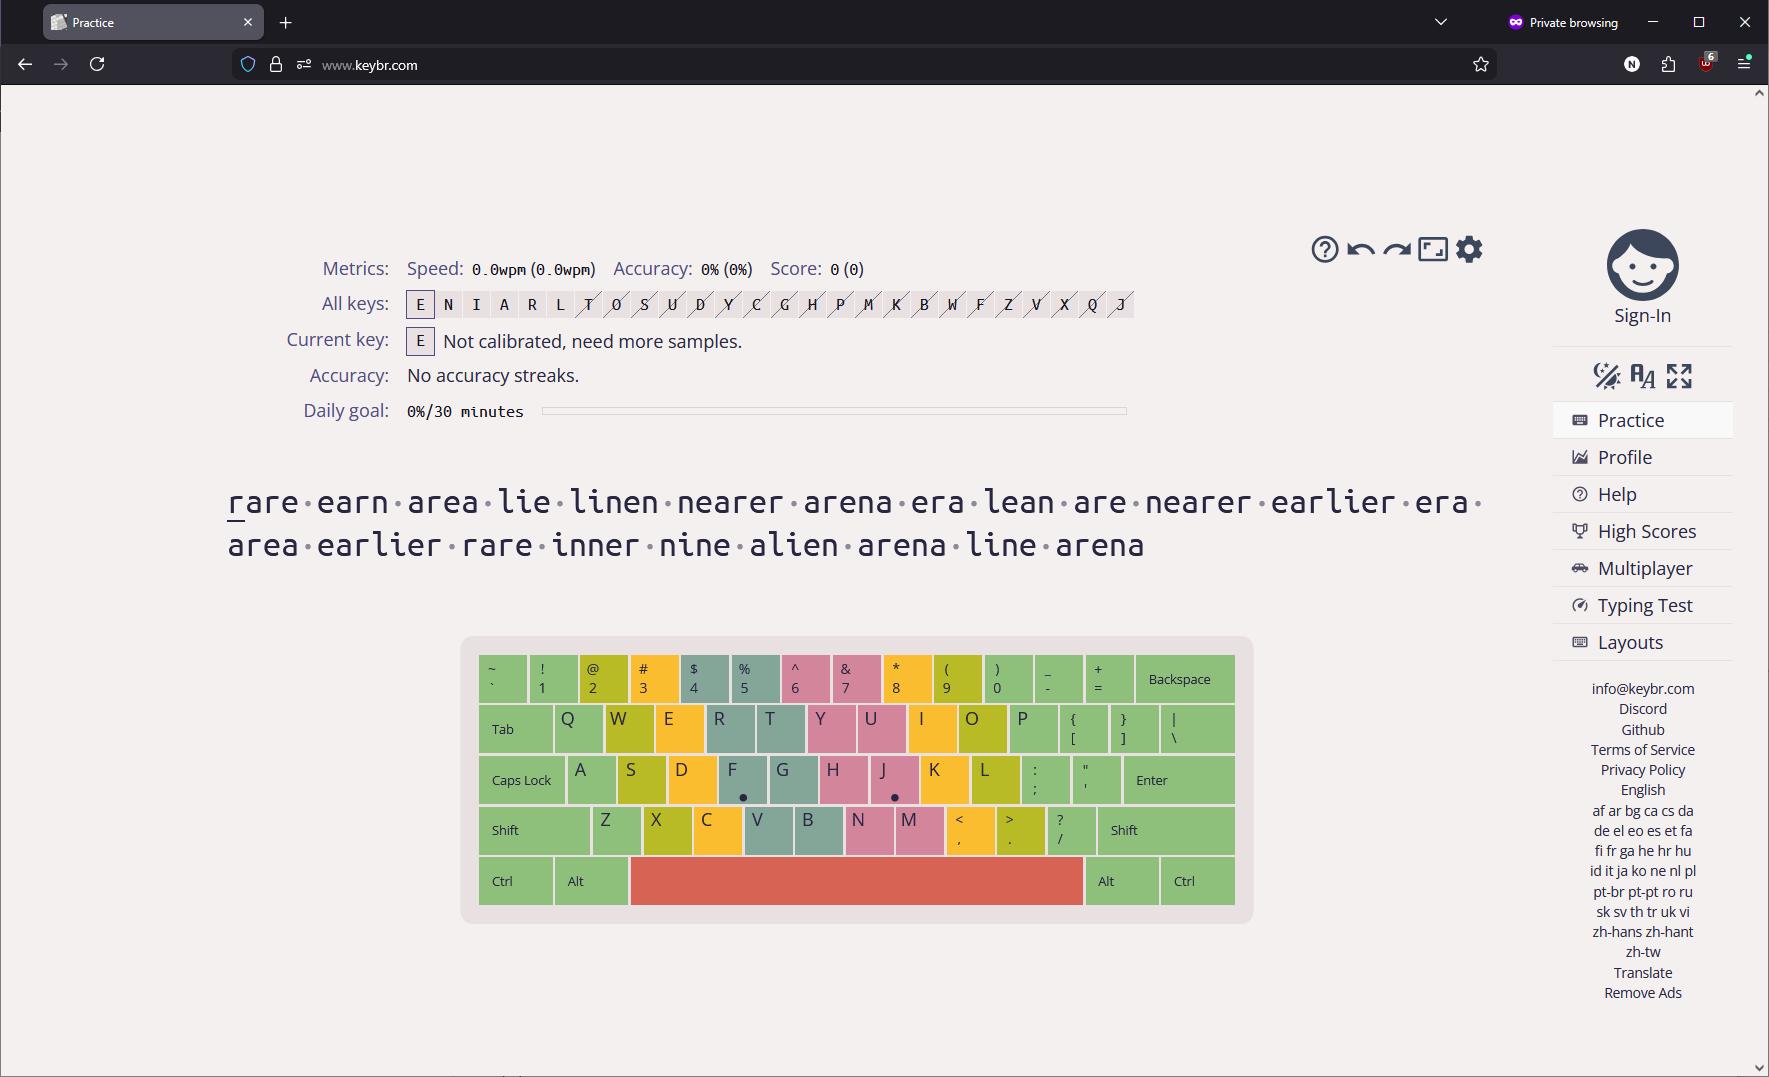
First thing to note is only 6 keys are available at the beginning. These are ordered by frequency so you’ll be learning the most useful patterns first!
As you type, more will become available as you reach the target speed in each key. You’re just learning for now so 35wpm is the goal.
And since you don’t want to be looking at your keyboard, all the visual guides you need are available on screen. Plant your index fingers on the [F] and [J] keys and let the other fingers fall naturally on the Home Row. Then, when you want to know how to press the next key, look at the guide. The blue and pink columns mean press with the respective index finger. Moving out, yellow is middle, and so on.
Little tip
If you want to make it more fun, go to the settings and turn off ‘Prefer Natural Words’.
Then, as you type, you get to try and figure out what words like ‘reen’ and ‘learal’ mean.
Here’s the vibe you’re aiming for:
- Right, I need to type ‘later’
- The guide shows the [L] is a Key Lime Pie looking green, that’s the right ring finger
- I’ll press that finger down without looking anddd… that worked!
- Next key, that’s an [A], okay, so that’s which finger?
As you learn each key, that learning process eventually stops and you just hit the key without thinking! And by restricting the keys you need to learn, you aren’t overwhelmed!
Typing just using these lessons, I managed to make my way through all the keys in a week. And within another week or so, I made it to 90wpm! This was lockdown so results may vary.
As you explore this yourself, you’ll eventually run into a problem. Which is:
People Suck
Why People Suck
Try typing that using just the touch typing fingers. People. People. People. It’s like your pinky finger and ring finger are dancing. When actually typing the word, I’ll typically alternate typing the [P] with my pinky and ring finger. It’s often faster, and doesn’t take long at all to find the home row again.
Typists tend to call this their typing style. Deviating from what’s taught for what feels more natural. I highly recommend just doing what’s taught at first until you unlock all the keys. At which point, you can play with the settings, add some new words into the lessons, or sod that off and get onto Monkeytype.
Monkeytype - Getting to 100wpm
Now you can type, you’ll want to practice more efficiently; Real words and common words. You can stick to Keybr if you want to practice specific keys, just bump up the target wpm when you reach it. But, for more practical experience, get onto Monkeytype.

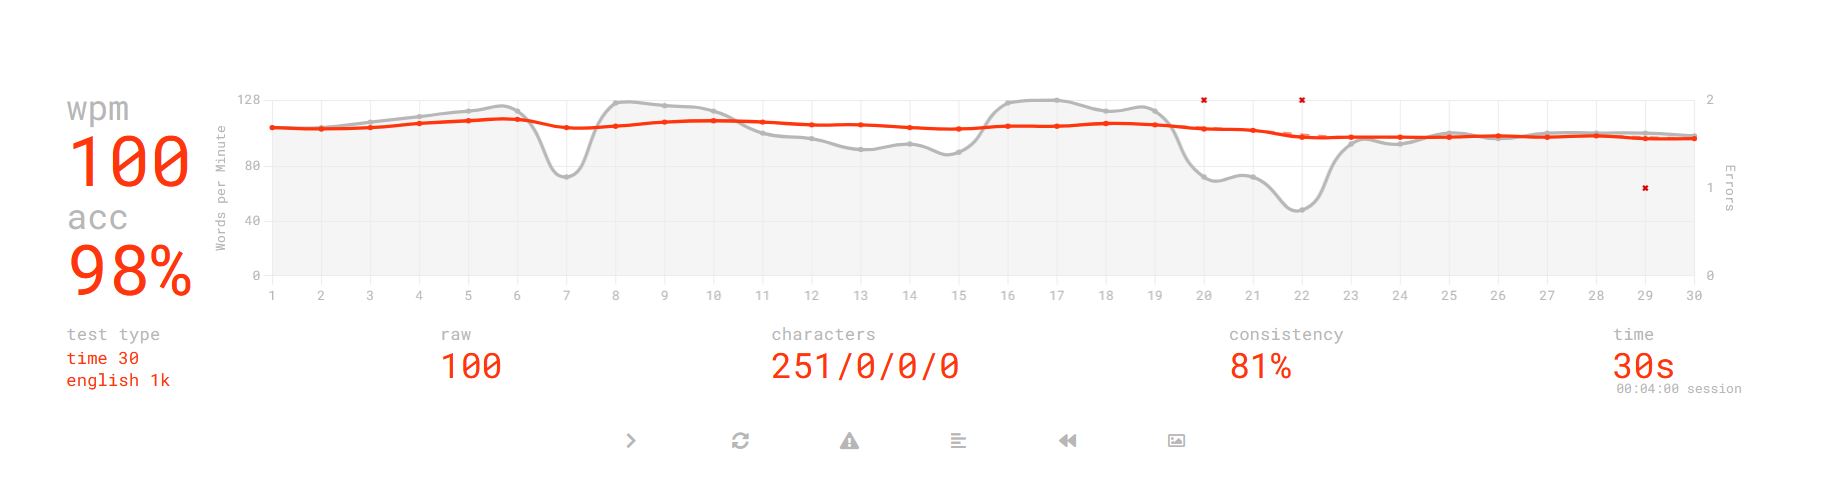
Monkeytype is well known amongst typists as a benchmark tool. However, the most useful thing I take from it is frequency lists. You’ll type the same 1000 words 90% of the time anyway, so why train other words before getting those down?
Give it a go. Hop onto Monkeytype now and take a look at the words given when set to English. Then, do it again, but with English 1k and see the difference. The default English list has a little over 200 words in it, which makes it very good for training how to type 200 words. Your wpm will take a dip as you add more words.
TL;DR
Here’s how I got here from finger picking:
- Get onto Keybr.com. Use the fingers the colour guide recommends for typing.
- Focus entirely on not making any mistakes. It’ll be slow, but worth the time.
- Keep going until you unlock all the keys. Then, move over to Monkeytype
- Again, no mistakes. Start with the English list (or any language, both Keybr and Monkeytype have a huge selection)
- Once you reach your target, move on to the English 1k.
- Rinse and repeat.
This teaches the skill; Then gives you the most common 250 words to practice; Then gives you the 1k words you’ll be typing all the time.
Personal Improvements
I suck at typing the same key more than once. Typing appearance or squirrel has a speed bump; How long it takes my finger to bounce. If I want to make bigger improvements, then I’ll need to fix that.